Kubernetes operators explained with Elastic
An introduction to ECK

Hey everyone! I'm a data engineer & an Elastic Certified based in France. My main stack is Elastic and Kubernetes, here to learn and share :)
Introduction
In this blog post, we are going to go through the concept of Kubernetes operator, its usage, when to use it, and how to use an operator. In the end, we'll see an example of operators using Elastic.
"Before diving into the blog, and forwarding my last blog I wrote, I want to express my gratitude to the amazing Hashnode community for organizing the #DebuggingFeb writeathon! I feel honored to have been recognized as a Runners-up prize winner. A big thank you to all the participants and a special thanks to Eleftheria Batsou !🙏"
What is a Kubernetes operator?
If we look at the definition of Kubernetes operator from RedHat:
...
A Kubernetes operator is an application-specific controller that extends the functionality of the Kubernetes API to create, configure, and manage instances of complex applications on behalf of a Kubernetes user
...
An operator is a custom Kubernetes controller that uses custom resources (CR) to manage applications and their components. High-level configuration and settings are provided by the user within a CR. The Kubernetes operator translates the high-level directives into the low level actions, based on best practices embedded within the operator’s logic.
Does it make sense? Maybe not, because it didn't for me the first time 😄
In layman's terms; Kubernetes operators are an extension of the Kubernetes API to create new Kubernetes objects. Objects in Kubernetes are defined with kind: something, for example: kind: ConfigMap, kind: Pod, etc. Meaning that using a Kubernetes operator will allow us to define new kinds of objects, like kind: kibana, or maybe kind: myServer to start your application.
But before creating any custom objects, you need to define the "resources" of this newly created object in Kubernetes. In other words, it's called CRD (Custom Resource Definition). Basically, the CRDs are like the recipe for the operator on how it's going to manage different resources, rules, and behaviors.
Explaining with an analogy
In case Kubernetes operators and/or CRDs are still a secret for you, this part will make it clearer than before.
If you are familiar with Object-Oriented Programming (OOP), perhaps you created classes with Java, Python, etc.
Let's take an example of a class 'Person' in Java (This code is generated with ChatGPT 😁, but not the whole blog 😉 ):
 public class Person {
    private String name;
    private int age;

    public Person(String name, int age) {
        this.name = name;
        this.age = age;
    }

    public String getName() {
        return name;
    }

    public void setName(String name) {
        this.name = name;
    }

    public int getAge() {
        return age;
    }

    public void setAge(int age) {
        this.age = age;
    }

    public void celebrateBirthday() {
        age++;
        System.out.println("Happy birthday, " + name + "! You are now " + age + " years old.");
    }

    public void introduce() {
        System.out.println("Hello, my name is " + name + " and I am " + age + " years old.");
    }
}
With the definition of the class Person, we created a new Java object that didn't exist before, with certain properties (name, age) and functionalities (celebrateBirthday(), introduce()). Furthermore, the getters and setters are kind of helpers for the object Person. The same analogy applies to Kubernetes operators, helping us create new kinds of objects in Kubernetes API, and the CRD is like a class in OOP to define and implement the logic to this new object.
Note that this analogy is meant to provide a conceptual understanding of Kubernetes operators by relating them to OOP concepts.
A must-know
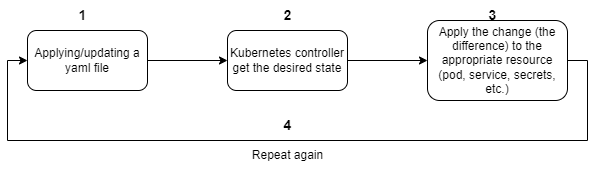
Now that you know what is a Kubernetes operator, you need to understand how it works. Once you create your object with any operator, Kubernetes will start something called a "reconciliation loop". It's a constant loop between what the user specified in the YAML file and what Kubernetes has as the last applied configuration. It will catch any change in the existing YAML configuration and update only the difference.
For example, in the first place, you deployed an elasticsearch instance version 7.17, Kubernetes operator will create the desired resources (secrets, services, pods, etc.) in order to be created, once you decide to upgrade the version of elasticsearch to 8.0, the reconciliation loop will capture this change and update only one specific resource which is stopping the pod with the old version and create a new one with version 8.0, but other Kubernetes resources like secrets, services, configmap, etc. will remain intact.
Creating your own Kubernetes operator
I feel you are motivated and want to create your own operator, it's easy unless you program in Go and are ready to spend time to make it work 😄.
You can check the official kubernetes documentation explaining how, or you can use the operator SDK to have a boilerplate for the operator which make it easy to start and is the recommended way, you can follow this post from Redhat which shows the steps in detail and also how to use the operator SDK.
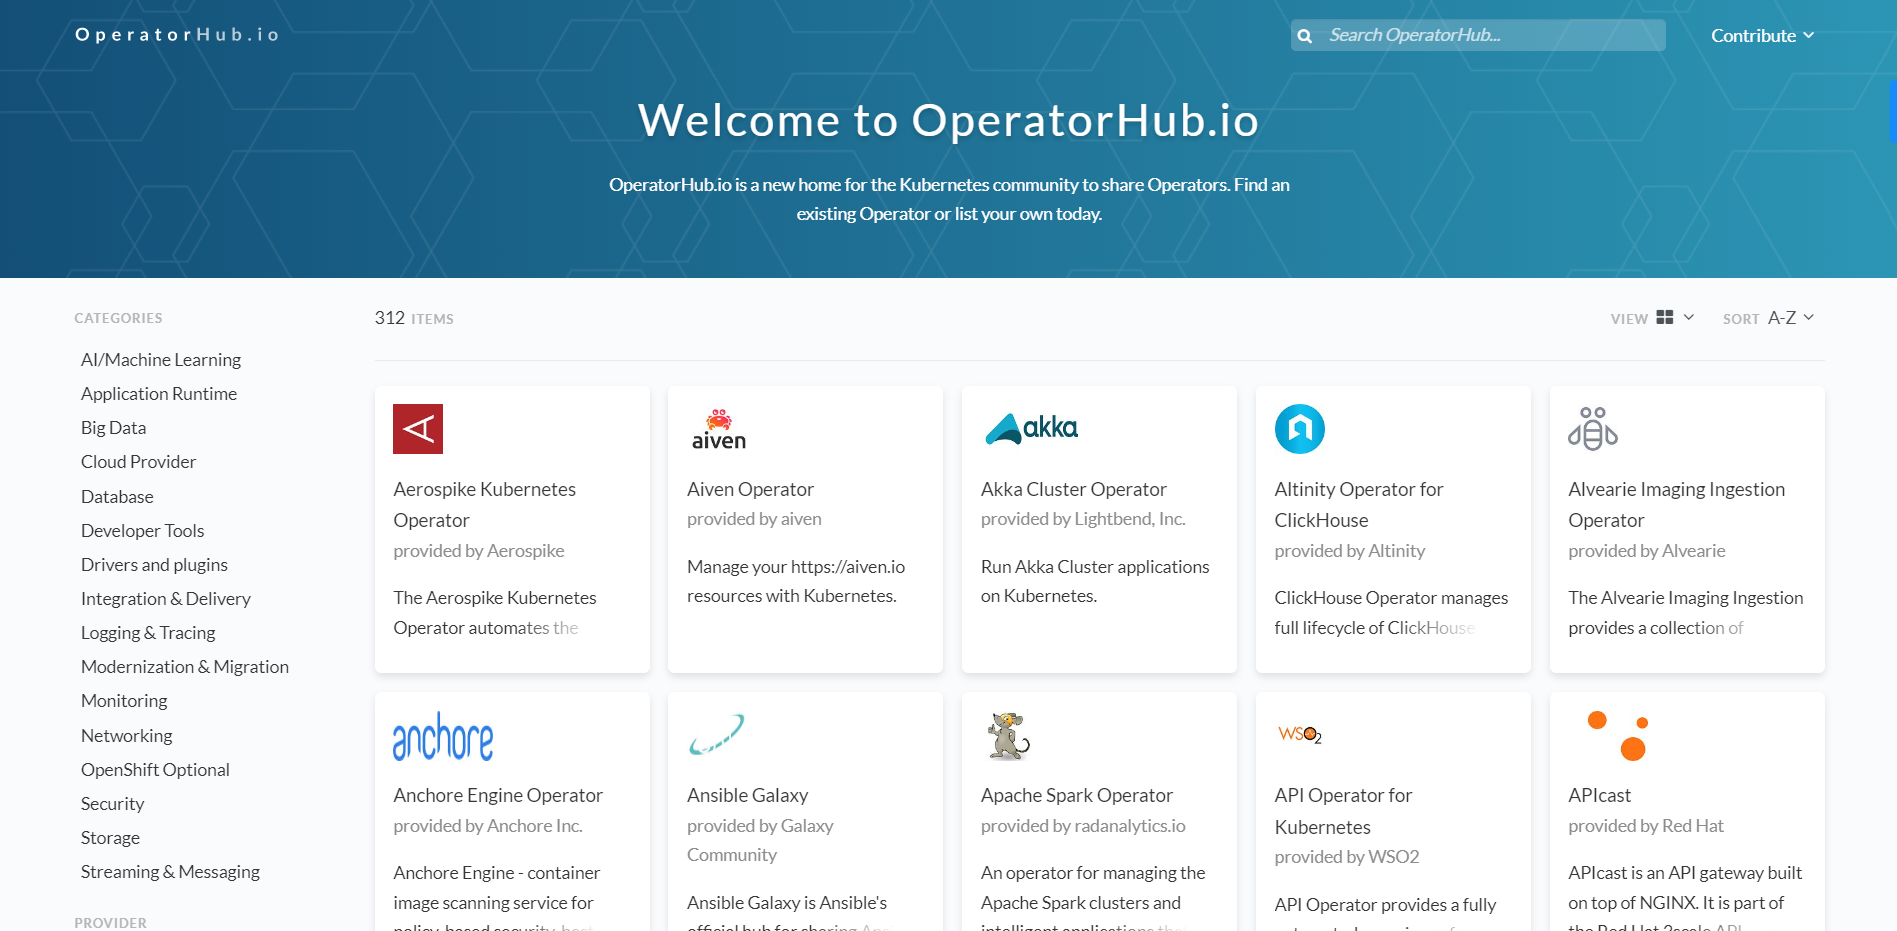
Finding your Operator
Fortunately, there is a hub called https://operatorhub.io/ where you can search for your operator and start playing with it, or contribute to your favorite one!
Maturity of an operator
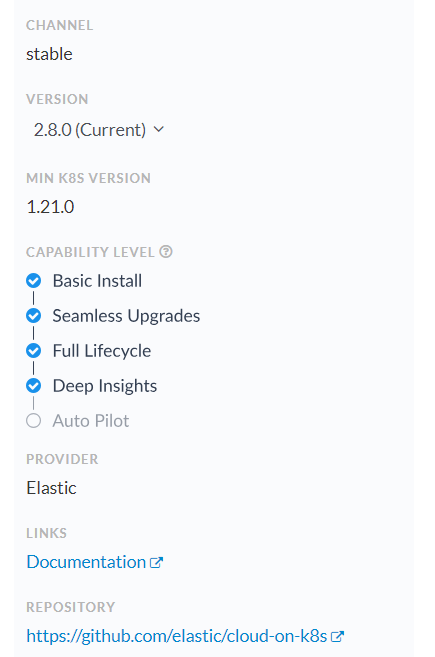
For operators, there are 5 levels of maturity, each operator can implement a few or all levels. An operator with a level of maturity 5 means it's fully automated without manual operation. See the picture below:

For the elastic operator, currently, it implements 4 levels of maturity which is great:
When use it?
In the realm of Kubernetes and native cloud, most likely you'll deal with a complex architecture having many components (for data ingestion, streaming, analytics, etc.). Each component has its own yaml configuration and refers to each other could lead to an overhead managing thousands of lines of code. In such a scenario, if you could replace any component with its operator if it exists, you can significantly save time in both management and configuration of various tools. Additionally, with the maturity of operators, you'll get rid of manual operations and achieve advanced automation similar to what ECK offers with autoscaling.
Operator in action with Elastic
Luckily in Elastic, we can use it to spin up an elastic cluster in less than a minute (Yes as you read, in less than a minute you have your cluster up and running😉).
The operator is called ECK (Elastic Cloud on Kubernetes), and the best places to start learning about it are the official documentation and this blog, as well as I'm going to give a brief introduction about it 😎.
Deploying the Elastic operator
Before deploying the operator, you need a Kubernetes cluster up and running, you can use:
or docker-desktop (personally I use it for this blog)
Once you have a Kubernetes cluster running in your local, run the following two commands to deploy the Elastic operator:
# Please visit https://www.elastic.co/guide/en/cloud-on-k8s/current/k8s-deploy-eck.html
# to deploy the latest version of ECK
kubectl create -f https://download.elastic.co/downloads/eck/2.8.0/crds.yaml
# and also run
kubectl apply -f https://download.elastic.co/downloads/eck/2.8.0/operator.yaml
The elastic operator will run under the newly created namespace elastic-system. To check the logs of the operator, run:
kubectl -n elastic-system logs -f statefulset.apps/elastic-operator.
and to check the list of namespaces:
$> kubectl get ns
NAME              STATUS   AGE
default           Active   34d
elastic-system    Active   5m
kube-node-lease   Active   34d
kube-public       Active   34d
kube-system       Active   34d
Deploying a single-node cluster
To deploy an ECK cluster, it's a good practice to deploy it on a dedicated namespace. Create a YAML file and call it whatever you want, in my case it's eck.yml, and paste the following code to create the namespace:
apiVersion: v1
kind: Namespace
metadata:
  name: eck-demo
save your file and run kubectl apply -f .\eck.yml
$> kubectl apply -f .\eck.yml
namespace/eck-demo created
$> kubectl get ns
NAME              STATUS   AGE
default           Active   34d
eck-demo          Active   63s
elastic-system    Active   6m
kube-node-lease   Active   34d
kube-public       Active   34d
kube-system       Active   34d
Deploying Elasticsearch & Kibana
In the same file, add the following code under the previous one:
apiVersion: v1
kind: Namespace
metadata:
  name: eck-demo
---
apiVersion: elasticsearch.k8s.elastic.co/v1
kind: Elasticsearch
metadata:
  name: quickstart
  namespace: eck-demo
spec:
  version: 8.8.0
  nodeSets:
  - name: default
    count: 1
    config:
      node.store.allow_mmap: false
---
apiVersion: kibana.k8s.elastic.co/v1
kind: Kibana
metadata:
  name: quickstart
  namespace: eck-demo
spec:
  version: 8.8.0
  count: 1
  elasticsearchRef:
    name: quickstart
  config:
     csp.strict: false
before running kubectl apply -f .\eck.yml, let's take a couple of minutes to understand the code:
For Elasticsearch:
in the
Kindkey, we enteredElasticsearch, this is only possible after installing the ECK operator. Before we couldn't as the kind of elasticsearch would be unknown for Kubernetes.in the
metadatakey, we specified the name of elasticsearch deployment with the keymetadata.nameand we specified the namespace with the keymetadata.namespaceto choose where to deploy itfor the
speckey, this is the interesting part! We specified the version with the keyspec.version. You can choose whatever version you want, even after Elasticsearch been created, you can upgrade to a new version, the ECK operator will handle the upgrade by moving your data to the new cluster, ensuring the consistency and integrity of your clusterthe
spec.nodeSetsaccept a list, which is in other words the group of nodes, meaning you can have more than one group of nodes and each group of nodes will have a new key to define the roles. A typical configuration would be:apiVersion: elasticsearch.k8s.elastic.co/v1 kind: Elasticsearch metadata: name: elasticsearch namespace: eck-multi-node version: 8.8.0 spec: nodeSets: - name: master count: 3 config: node.roles: ["master","remote_cluster_client"] - name: data count: 5 config: node.roles: [ "data","ingest","transform","remote_cluster_client" ] - name: ml count: 2 config: node.roles: [ "ml"]Note that in a multi-node cluster we tend to configure other advanced components like: storage, CPU/RAM resources, node allocation awareness, etc. Above is a small compact example for this blogpost!
the key
nodeSets.nameis the name of the group of nodes (i.emasteranddata), like:apiVersion: elasticsearch.k8s.elastic.co/v1 kind: Elasticsearch # ... spec: version: 8.8.0 nodeSets: - name: master count: 3 config: node.store.allow_mmap: false - name: data count: 5 config: node.store.allow_mmap: falsethe key
nodeSets.countis the number of nodes you want for a given group of nodes. In our example, the group of nodes with the namedefaulthas only 1 node.the last key
nodeSets.configis a system configuration for the container.
For Kibana:
Kibana has almost the same specification as Elasticsearch, except for a few differences
the key
spec.elasticsearchRefreference an elasticsearch deployment, you have to pass its name by using the keyspec.elasticsearchRef.name. Furthermore, Kibana and Elasticsearch must run in the same Kubernetes namespace to be referenced!the last key
spec.config.csp.strictis to avoid Content Security Policy (CSP) for Chrome users so Kibana can run without any issues.
Once you digested all the concepts explained above, we can go apply the yaml file: kubectl apply -f .\eck.yml
$> kubectl apply -f .\eck.yml
namespace/eck-demo unchanged
elasticsearch.elasticsearch.k8s.elastic.co/quickstart created
kibana.kibana.k8s.elastic.co/quickstart created
Bravo! Now you just created your first elastic cluster using ECK 🥳.
In the output of the previous command, it's saying that elasticsearch and kibana resources are created, now let's take a look on what is deployed under the namespace eck-demo.
Run the following command: kubectl get all -n eck-demo
$> kubectl get all -n eck-demo
NAME                                READY   STATUS    RESTARTS   AGE
pod/quickstart-es-default-0         1/1     Running   0          3m39s
pod/quickstart-kb-fc9f864cf-xjwwq   1/1     Running   0          3m38s

NAME                                  TYPE        CLUSTER-IP       EXTERNAL-IP   PORT(S)    AGE
service/quickstart-es-default         ClusterIP   None             <none>        9200/TCP   3m39s
service/quickstart-es-http            ClusterIP   10.100.152.16    <none>        9200/TCP   3m40s
service/quickstart-es-internal-http   ClusterIP   10.100.245.223   <none>        9200/TCP   3m40s
service/quickstart-es-transport       ClusterIP   None             <none>        9300/TCP   3m40s
service/quickstart-kb-http            ClusterIP   10.100.17.196    <none>        5601/TCP   3m39s

NAME                            READY   UP-TO-DATE   AVAILABLE   AGE
deployment.apps/quickstart-kb   1/1     1            1           3m38s

NAME                                      DESIRED   CURRENT   READY   AGE
replicaset.apps/quickstart-kb-fc9f864cf   1         1         1       3m38s

NAME                                     READY   AGE
statefulset.apps/quickstart-es-default   1/1     3m39s
You notice with writing a few lines of code, results in many components being deployed, like: pods, services, deployment, etc. On the other hand, if you check the operator logs with kubectl -n elastic-system logs -f statefulset.apps/elastic-operator, you'll see something like:
$> kubectl -n elastic-system logs -f statefulset.apps/elastic-operator
{"log.level":"info","@timestamp":"2023-07-18T21:35:36.624Z","log.logger":"kb-es","message":"Associated resource Service is not available yet","service.version":"2.7.0+0ef8d5e3","service.type":"eck","ecs.version":"1.4.0","iteration":"1","namespace":"eck-demo","kb_name":"quickstart","error":"while fetching referenced service: Service \"quickstart-es-http\" not found","name":"quickstart","ref_name":"quickstart"}
{"log.level":"info","@timestamp":"2023-07-18T21:35:36.626Z","log.logger":"elasticsearch-controller","message":"Creating resource","service.version":"2.7.0+0ef8d5e3","service.type":"eck","ecs.version":"1.4.0","iteration":"1","namespace":"eck-demo","es_name":"quickstart","kind":"Service","namespace":"eck-demo","name":"quickstart-es-transport"}
...
{"log.level":"info","@timestamp":"2023-07-18T21:36:18.007Z","log.logger":"elasticsearch-controller","message":"Starting reconciliation run","service.version":"2.7.0+0ef8d5e3","service.type":"eck","ecs.version":"1.4.0","iteration":"26","namespace":"eck-demo","es_name":"quickstart"}
{"log.level":"info","@timestamp":"2023-07-18T21:36:18.065Z","log.logger":"elasticsearch-controller","message":"Ensuring no voting exclusions are set","service.version":"2.7.0+0ef8d5e3","service.type":"eck","ecs.version":"1.4.0","iteration":"26","namespace":"eck-demo","es_name":"quickstart","namespace":"eck-demo","es_name":"quickstart"}
{"log.level":"info","@timestamp":"2023-07-18T21:36:18.107Z","log.logger":"elasticsearch-controller","message":"Ending reconciliation run","service.version":"2.7.0+0ef8d5e3","service.type":"eck","ecs.version":"1.4.0","iteration":"26","namespace":"eck-demo","es_name":"quickstart","took":0.099722579}
{"log.level":"info","@timestamp":"2023-07-18T21:36:18.107Z","log.logger":"elasticsearch-controller","message":"Starting reconciliation run","service.version":"2.7.0+0ef8d5e3","service.type":"eck","ecs.version":"1.4.0","iteration":"27","namespace":"eck-demo","es_name":"quickstart"}
{"log.level":"info","@timestamp":"2023-07-18T21:36:18.115Z","log.logger":"remoteca-controller","message":"Starting reconciliation run","service.version":"2.7.0+0ef8d5e3","service.type":"eck","ecs.version":"1.4.0","iteration":"26","namespace":"eck-demo","es_name":"quickstart"}
{"log.level":"info","@timestamp":"2023-07-18T21:36:18.115Z","log.logger":"remoteca-controller","message":"Ending reconciliation run","service.version":"2.7.0+0ef8d5e3","service.type":"eck","ecs.version":"1.4.0","iteration":"26","namespace":"eck-demo","es_name":"quickstart","took":0.000120799}
...
These log lines indicate when the operator started provisioning resources and keep running the reconciliation loop indefinitely, when started (on iteration 26) and when it ended (iteration 27), the elastic operator checks inside the namespace eck-demo if there is a change in the state (for e.g in a configuration like increasing the number of nodes), once it finds any changes, it applies automatically the desired state. The time it took for the reconciliation loop to finish iteration 26 and to start iteration 27 was 100ms.
One cool feature I like about ECK is you can check the health of your deployment if it's ready or not:
$> kubectl get elasticsearch -n eck-demo
NAME         HEALTH   NODES   VERSION   PHASE   AGE
quickstart   green    1       8.8.0     Ready   38m
this was possible because of the operator, and Kubernetes API understands what is the resource elasticsearch we pass to kubectl, just like the previous class Person in Java where we implemented the getter. We can do the same with Kibana: kubectl get kibana -n eck-demo and other ECK resources (like beats, apm, etc.).
The previous command is equivalent to the cat API.
Accessing Kibana UI
Before going straight on how to access Kibana, we need to retrieve the password of the user elastic. ECK generates a random password on each deployment. To get it run the following:
$> kubectl get secret quickstart-es-elastic-user -o go-template='{{.data.elastic | base64decode}}' -n eck-demo
96P7r0uqk91Ly06fDVMXO8s1
the returned string, in my case "96P7r0uqk91Ly06fDVMXO8s1" is the password, save it somewhere because we'll need it.
To access Kibana, we need to expose the service quickstart-kb-http, run: kubectl get svc -n eck-demo to list all services deployed. You have to run :
kubectl port-forward service/quickstart-kb-http -n eck-demo 5601:5601 to expose kibana to access it from outside, and now you can open https://localhost:5601 to view the kibana UI (you have to use https not http in order to work, see) !

In a production environment, to expose Kibana you need to have an ingress. A typical configuration using nginx would be:
kind: Ingress
apiVersion: networking.k8s.io/v1
metadata:
  name: kibana
  namespace: eck-demo
  annotations:
    ingress.kubernetes.io/rewrite-target: /
    kubernetes.io/ingress.class: nginx

spec:
  rules:
    - host: kibana.YOUR_DOMAIN.com
      http:
        paths:
          - path: /
            pathType: ImplementationSpecific
            backend:
              service:
                name: quickstart-kb-http
                port:
                  number: 5601
If you want, you can expose elasticsearch as well:
kubectl port-forward service/quickstart-es-http -n eck-demo 9200:9200 and open https://localhost:9200/
Bonus: deploying Filebeat
If you are reading this last part meaning that you have a working elastic cluster but it needs some data. In this part we will deploy filebeat like we did with elasticsearch and kibana using operators! In case it's your first time hearing about filebeat, check the doc.
Create a new file called filebeat.yml and paste the following code:
apiVersion: beat.k8s.elastic.co/v1beta1
kind: Beat
metadata:
  name: quickstart
  namespace: eck-demo
spec:
  type: filebeat
  version: 8.8.0
  elasticsearchRef:
    name: quickstart
  config:
    filebeat.inputs:
    - type: container
      paths:
      - /var/log/containers/*.log
  daemonSet:
    podTemplate:
      spec:
        dnsPolicy: ClusterFirstWithHostNet
        hostNetwork: true
        securityContext:
          runAsUser: 0
        containers:
        - name: filebeat
          volumeMounts:
          - name: varlogcontainers
            mountPath: /var/log/containers
          - name: varlogpods
            mountPath: /var/log/pods
          - name: varlibdockercontainers
            mountPath: /var/lib/docker/containers
        volumes:
        - name: varlogcontainers
          hostPath:
            path: /var/log/containers
        - name: varlogpods
          hostPath:
            path: /var/log/pods
        - name: varlibdockercontainers
          hostPath:
            path: /var/lib/docker/containers
Apply the configuration using kubectl apply -f .\filebeat.yml and run
kubectl get beat -n eck-demo -w to watch filebeat status until it turns to green, next go to observability app from Kibana UI https://localhost:5601/app/observability/ and you have to see we are getting some logs:

and the index filebeat-8.8.2 is created!

Cleaning deployed resources
To remove components being deployed, run the following:
kubectl delete elasticsearch quickstart -n eck-demokubectl delete kibana quickstart -n eck-demokubectl delete beat quickstart -n eck-demo
Conclusion
In this blog post, we discovered the concept of Kubernetes operator, how it works, some fundamentals concept about it like the reconciliation loop, and an example using ECK. Furthermore, we saw that operators have 5 maturity levels and for ECK it achieves 4 levels. We can partially reach level 5 with the autoscaling feature.
Keep in mind that operators are improving and many features are added by the community, stay always updated!
References:


